
Can you make Greek yogurt in any yogurt maker? The short answer is yes, but the full answer depends on the machine you own. Most yogurt makers hold milk at a steady, warm temperature long enough for the live cultures to ferment it. That part is universal. What happens after fermentation, however, is where many assumptions begin to break down. Greek yogurt does not require a different fermentation process. Instead, it starts as regular yogurt, and you create its thick, creamy texture by straining out the whey.
In most cases, a standard yogurt maker can produce the base yogurt that eventually becomes Greek yogurt. Whether it can make Greek yogurt on its own, without additional equipment or an extra straining step, depends entirely on the model.
How Home Yogurt Makers Actually Work
A yogurt maker is essentially a warming chamber. It keeps milk mixed with a starter culture somewhere between 100°F and 115°F (38°C to 46°C) for six to twelve hours, which is the range where the bacteria in the culture are active enough to convert lactose into lactic acid. That acid is what thickens the milk and gives yogurt its tang.
The two bacterial strains doing most of the work in a typical starter are Lactobacillus bulgaricus and Streptococcus thermophilus. Some composite starters also contain Bifidobacterium. Although it has little effect on the final texture, manufacturers often market it for its probiotic benefits.
None of this cares whether the end goal is regular yogurt or Greek yogurt. The bacteria don’t ferment differently based on what happens to the batch afterward. This is the part of the process that’s genuinely universal across nearly every consumer yogurt maker, from basic single-jar models to multi-container digital ones. If you’re shopping and trying to sort through the options, a general roundup like 5 best yogurt makers is a reasonable starting point before narrowing down by feature.
How Every Yogurt Maker Creates the Same Yogurt Base

Regular yogurt and Greek yogurt come from the exact same fermentation base. There’s no separate culture, no separate temperature curve, no special ingredient that distinguishes one from the other at the fermentation stage. The only thing that changes is what happens once the jar comes out of the machine.
Greek yogurt requires one additional step: straining out excess whey. How long that straining runs determines the final texture almost entirely.
| Straining Time | Resulting Texture | Common Use |
|---|---|---|
| No straining | Regular yogurt | Standard eating yogurt |
| 2–4 hours | Classic Greek yogurt | Store-bought equivalent texture |
| 4–6 hours | Very thick, dense | Dips, high-protein snacking |
| Overnight, refrigerated | Cream cheese–like | Spreads, labneh |
This is worth sitting with for a second, because it means the machine itself isn’t the limiting factor most people assume it is. The limiting factor is whether you’re willing to strain the batch afterward.
Do You Need a Greek Yogurt Setting on a Yogurt Maker?
Here’s where people usually go wrong: they assume a “Greek yogurt setting” on a machine means the appliance is doing something structurally different during fermentation. In nearly every case, that setting just adjusts fermentation time slightly, sometimes running a bit longer to build more acidity into the base, which manufacturers then market as a “Greek-style” preset. It’s a labeling decision more than a functional one.
Only a small number of machines, typically ones sold with a built-in strainer basket, actually handle the whey removal for you. If your machine didn’t come with one of those, you’ll be straining manually no matter what the settings dial says. And that’s fine. Manual straining is neither difficult nor time-intensive once it’s part of your routine.
How to Strain Homemade Greek Yogurt Step by Step
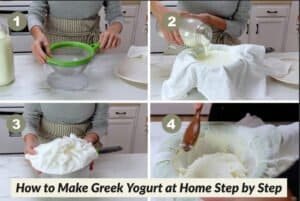
How to Strain Yogurt to Make Homemade Greek Yogurt
Once your yogurt has finished fermenting and developed a firm, jiggly consistency, you can turn it into homemade Greek yogurt by straining out the whey. Straining is the only step that separates Greek yogurt from regular yogurt, giving it its signature thick, creamy texture.
Line a fine-mesh strainer with food-grade cheesecloth or a reusable nylon nut milk bag, then place the strainer over a large bowl. Carefully pour the fermented yogurt into the lined strainer and refrigerate it while the whey drains away naturally.
For yogurt made with whole milk, strain for 2 to 4 hours to achieve a classic Greek yogurt consistency. If you prefer a thicker texture, continue straining for 4 to 6 hours. Leaving the yogurt to strain overnight in the refrigerator creates an extra-thick, spreadable texture similar to soft cream cheese.
How to Set Up Your Greek Yogurt Strainer Correctly
Place the strainer on a stable shelf in the upper section of your refrigerator and leave enough space underneath for a bowl to collect the draining whey. Avoid placing the setup near the refrigerator door, where opening and closing the door could disturb or tip the container.
Before you begin, thoroughly sanitise all equipment that will touch the yogurt, including the cheesecloth, strainer, bowls, and utensils. You can do this by scalding them with boiling water or running them through a hot dishwasher cycle. Proper sanitation helps protect the live cultures and reduces the risk of unwanted bacteria affecting your homemade Greek yogurt.
Avoid This Common Mistake When Straining Greek Yogurt
Resist the temptation to squeeze or press the cheesecloth to speed up the process. Although it may seem like a quicker solution, pressing forces fine yogurt solids through the cloth together with the whey. As a result, your finished Greek yogurt can become grainy instead of smooth and creamy.
For the best results, allow gravity to remove the whey naturally. A slow, undisturbed straining process produces the thick, silky texture that makes homemade Greek yogurt so enjoyable.
Machine Types and What Actually Changes Between Them
Not every yogurt maker handles the process equally well, so you should understand the practical differences before choosing a model.
Jar-style yogurt makers ferment yogurt in individual glass jars. Although they are common and inexpensive, manufacturers did not design them for easy straining. You’ll transfer each jar’s contents to cheesecloth separately, which adds a few extra minutes compared to single-vessel models.
Single-container machines, where the whole batch ferments in one larger vessel, make straining simpler since you’re handling one batch rather than several small ones.
Instant Pot–style multi-function cookers with a yogurt setting sit in between. They ferment reliably, but straining remains a separate manual step regardless of which preset is used.
All-in-one Greek yogurt machines with a built-in draining basket are the exception. These skip manual straining entirely, since the basket does the separation while the batch sits in the fridge. If that convenience matters to you, it’s worth comparing dedicated models side by side in a guide like best yogurt makers for probiotic-rich snacks, which covers a few of these built-in-strainer options directly.
For countertop machines with only basic fermentation functions and no fancy presets, the one thing worth confirming before buying is whether the unit holds a stable 40–43°C throughout the cycle. If the temperature stays outside that range for too long, it can damage the starter culture and prevent the batch from setting properly.
Milk and Starter Choices Matter More Than the Machine
Whole milk produces a noticeably creamier result than skim milk, and starting with higher-fat milk means retaining more richness even after straining removes the whey. Pasteurized whole milk is generally preferable to ultra-high-temperature (UHT) processed milk, since pasteurized milk retains more of its natural fat structure, which shows up as a smoother, creamier mouthfeel in the finished yogurt. Milk with added preservatives or stabilizers is worth avoiding, since some of those additives can interfere with culture activity.
Start with a composite bacterial powder containing both Lactobacillus and Bifidobacterium strains because it usually produces more consistent results than using store-bought yogurt as a starter. Store-bought yogurt often contains added thickeners, gelatin, or preservatives that manufacturers did not intend for re-culturing.
Some home yogurt makers add a spoonful of powdered milk to the base before culturing, specifically to boost the protein content going in. This shortens how long straining needs to take afterward, since there’s less excess whey relative to solids to begin with.
Why the Protein Difference Actually Matters
Part of the appeal of Greek yogurt is the protein bump, and it’s worth understanding where that comes from mechanically rather than just accepting it as a marketing claim. Whey contains a meaningful amount of protein itself, but it’s diluted across a lot of liquid. When straining removes that liquid, what’s left behind is a much more concentrated ratio of protein and fat to total volume.

A cup of regular yogurt and a cup of Greek yogurt made from the exact same starting batch will have noticeably different protein density, purely because one has had roughly half its liquid volume removed. This is also why Greek yogurt calorie counts per serving tend to run a bit higher than regular yogurt, since you’re eating a more concentrated product, not a lighter one.
This matters for anyone treating homemade Greek yogurt as a high-protein snack rather than just a texture preference. Straining longer genuinely does concentrate protein further, up to a point, though the returns diminish once you’re well past the four-to-six-hour mark and moving into labneh territory.
What to Do If a Batch Doesn’t Set Properly
Occasionally a batch comes out of the machine looking more like thick milk than yogurt, and it’s worth knowing why before assuming the machine is faulty.
The most common cause is a starter culture that was either too old or wasn’t kept refrigerated properly before use. Bacterial cultures lose potency over time, and a starter that’s been sitting in a cupboard rather than a fridge is often the culprit.
A second common cause is temperature drift during the fermentation cycle itself, particularly in basic machines without digital temperature regulation. If the unit sits in a drafty spot or is opened partway through the cycle to check on it, the temperature dip can be enough to slow bacterial activity meaningfully.
A batch that hasn’t set at all shouldn’t be strained, since there isn’t enough structure yet to hold together in cheesecloth. It’s usually better to extend the fermentation time by another hour or two and check again, rather than moving straight to straining a loose batch.
Flavoring and Sweetening After Straining
Straining concentrates the tang along with everything else, so a batch that tasted mild before straining often tastes noticeably more sour afterward. This is normal and not a sign anything went wrong.
If flavoring the finished Greek yogurt, it’s generally better to mix in honey, fruit, or vanilla after straining rather than before. Adding sugar or fruit to the base prior to fermentation can interfere with how the cultures behave, and sweeteners added before straining will partially strain out along with the whey anyway, which wastes both the sweetener and the effort.
For fruit purees specifically, folding them in just before serving, rather than storing a fully mixed batch, tends to preserve texture better over a longer storage period, since some fruits release additional liquid over time that can thin the yogurt back out.
Cleaning and Maintaining Your Yogurt Maker
Because yogurt makers hold warm, moist conditions for extended periods, they’re also a reasonable environment for unwanted bacteria or mold if not cleaned properly between batches. Jars and lids should be washed with hot, soapy water after every batch, and it’s worth periodically running a vinegar rinse through jar-style units to clear any mineral buildup from repeated use.
Digital base units with heating elements typically shouldn’t be submerged, so wiping the exterior and base tray with a damp cloth is usually sufficient, while the jars or containers themselves get the more thorough wash. Anyone keeping their kitchen equipment in good working order more broadly might find it useful to check a general piece like 8 essential kitchen safety tips, since a fair amount of appliance longevity comes down to basic cleaning habits rather than the equipment itself.
Common Mistakes People Make With Homemade Greek Yogurt
A handful of patterns show up again and again:
Straining for too short a time and expecting Greek-yogurt thickness. Twenty minutes on the counter is a light drain, not real straining.
Leaving the batch to strain at room temperature instead of refrigerated. Room-temperature straining makes the yogurt more likely to pick up odors from the kitchen, and in warmer environments it opens the door to unwanted bacterial growth.
Squeezing or pressing the cheesecloth to rush the process, which pushes yogurt solids through the mesh and leaves a grainy texture behind.
Assuming a machine’s “Greek” preset eliminates the need to strain at all. It doesn’t, in most cases, and people are often surprised to learn that even after specifically choosing that setting.
Tossing the strained whey down the drain. It’s genuinely useful in baking, smoothies, and soups, and pouring it out is one of the more common small wastes in home yogurt-making.
Using a starter that’s been sitting unrefrigerated, then blaming the machine when the batch doesn’t set.
A Quick Note on Kitchen Setup
If you’re working through regular batches with jar transfers and straining setups, having decent counter and fridge organization saves more hassle than people expect. Anyone reworking their prep space around this kind of routine might find some use in a broader piece on smart kitchen organization, since straining setups tend to take up more fridge shelf space than the actual fermentation step does. And for anyone keeping multiple jars, bowls, and filter bags in rotation, a look at 8 essential food storage containers is worth a glance too, since the right containers make the whey-catching step a lot less messy.
FAQs
Does my yogurt maker need a specific Greek yogurt setting to make Greek yogurt?
No. A Greek yogurt setting usually just adjusts fermentation time slightly. Straining after fermentation is what actually produces Greek yogurt, and that step works the same regardless of which setting was used.
Can I use plant-based milk in a yogurt maker and still strain it into a Greek style?
Some plant milks, particularly soy and certain blended coconut milks, will set with the right culture and can be strained similarly. Almond milk and oat milk tend to need added thickeners, and texture results vary more than with dairy milk.
How long can strained Greek yogurt be stored?
Typically 1 to 2 weeks refrigerated. Because it holds less free moisture than regular yogurt, the texture tends to stay more stable over that period.
Is it normal for homemade Greek yogurt to taste more sour than store-bought?
Yes. Longer fermentation times, often used to build a thicker base before straining, increase acidity. Ending fermentation a bit earlier before straining can mellow the tang if it’s too strong for your taste.
What can I do with the leftover whey after straining?
It works well replacing part of the water in bread dough, blending into smoothies for extra protein, forming a base for soups, or marinating meat, since it’s naturally acidic.
Can I make Greek yogurt with skim milk instead of whole milk?
Yes, though the finished product will be thinner going in, so the straining time typically needs to run 1 to 2 hours longer to reach the same thickness as a whole-milk batch.
Why did my batch come out runny even after straining for several hours?
This usually traces back to a weak starter culture or a fermentation cycle that didn’t fully set the batch before straining began. If the yogurt was already loose going into the cheesecloth, straining alone won’t fully compensate.
For more on choosing equipment suited to this kind of prep, the best yogurt makers for probiotic-rich snacks guide covers a few models with built-in straining features in more detail.